
{ Design Resources, Rules, & Help Guide }
Designing Rules
- While resemblance is allowed, genes/mutations should not be used to clearly mimic other genes/mutations.
- Up to four (4) genes and/or mutations may be carried in total. This means they won't show on the Import, but will still be in the genetic data. Beyond this, any gene/mutation that isn't shown must be removed with a Cleansing Potion.
- Genes may be accommodated to follow the fur's direction in different fur types ( e.g. appear a bit longer on Mop fur, or wobblier on Curly fur ), as long as it's still roughly within the gene's rules.
- Mutations must be layered in a way that makes logical sense; additionally, some mutations may require line work edits to properly match with one another.
- Mutations may be freely customized/edited before Approvals. Other physical traits or line work may not be edited until Parlor, through the use of the respective Parlor item(s). Edits should be made with a similar brush, and should be coherent in style with the original Import lines.
- The tail folder must always sit below the body folder, and the proximal/deer-like tail must always be visible atop the distal/feathered tail.
- While inspiration is allowed, designs may never mimic copyrighted content or other people's intellectual property.
Understanding the Geno
Whenever you receive a genotype— be it through Breeding, the Adoption Center, a trade, etc— you'll receive a list of traits and genes that will seem intimidating or confusing at first. Understanding it, and learning to read it, is vital for designing!
Luckily, it's rather easy to understand once it's broken down.
Luckily, it's rather easy to understand once it's broken down.
The geno you receive will look something like this.
We'll be using our starter Dasher's geno for the guide!
This is what the geno looks like:
We'll be using our starter Dasher's geno for the guide!
This is what the geno looks like:
|
Lean Koinos Twist - Whip Healthy F/c/s/[Iv]/nBch/nH/nP/StSt [Ivory] Fuchsia with Bleach Hood Pangare Stripes [Dasher] [Air] |
And this is how we break it down and read it!
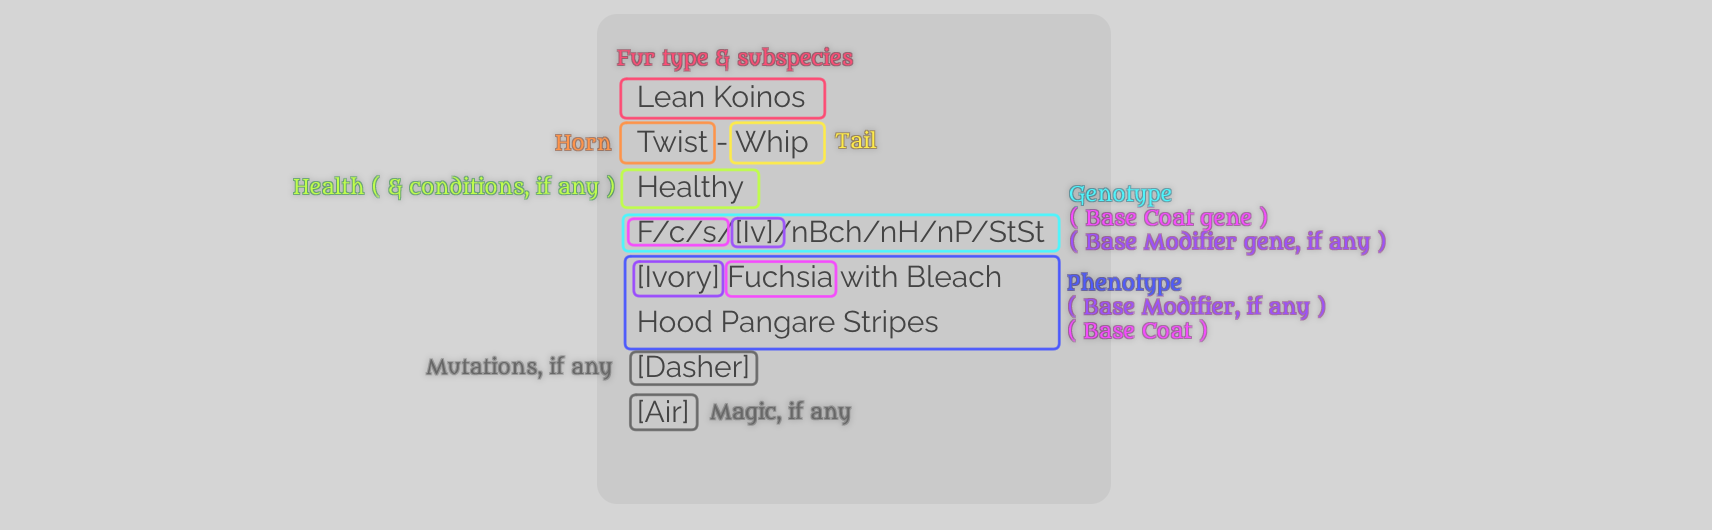
Some important notes to pay attention to when reading any geno:
- Physical Traits: the Fur type, Horn, Tail, and Mutations will dictate what folders you toggle on or off before designing.
- Health conditions may affect how a design looks, but healthy genos won't be affected at all. You can read about Health conditions here! You may apply health conditions to an originally-healthy geno as you please.
- The Base Modifier, Mutations, and Magic sections won't always be present!
- Recessive vs Dominant Genes: a gene code that begins with a lowercase "n" is recessive. On the other hand, a gene code that does not begin with a lowercase "n" and is instead repeated twice is dominant. Recessive genes follow regular gene rules; dominant genes will sometimes have special extra coverage/color/texture rules! Dasher, for example, has recessive Bleach ( nBch ), Hood ( nH ), and Pangare ( nP ), but has dominant Stripes ( StSt )!
Picking the Right Import Base
Now that you can read your geno, it’s time to begin designing! The most vital step to designing is picking the right Import base.
An Import base is a base with predetermined, toggle-able traits, where you design your geno to get it officially approved into the game. You can find all Import bases in the button below!
You’ll notice each Import base has a name; all you need to do is find the base that matches your geno’s first line! That will be your geno’s correct base, and the one you’ll design your geno in. For us, it's the Lean Koinos base.
Once you’re ready to design, open the base in your digital drawing program of choice.
Please keep in mind that handheld devices and applications may not be able to open the file. If that is the case, please ask a friend or community member to help you by sending you a lighter .psd file with only the traits you need, or by designing your geno for you ( this does not equal asking for free goods, please be mindful ).
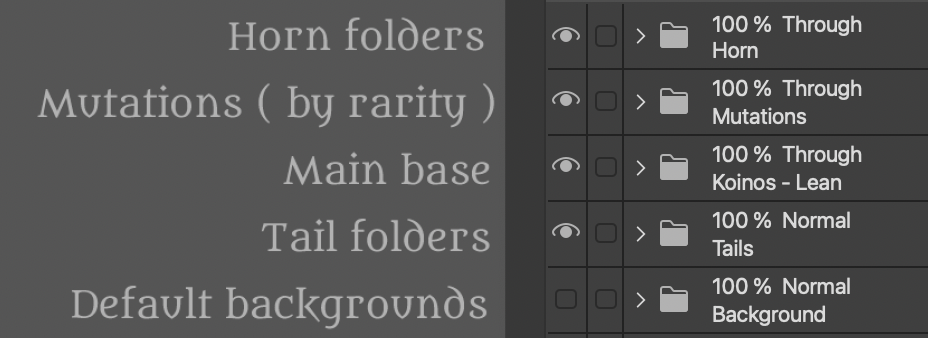
Import Folders & the Right Traits
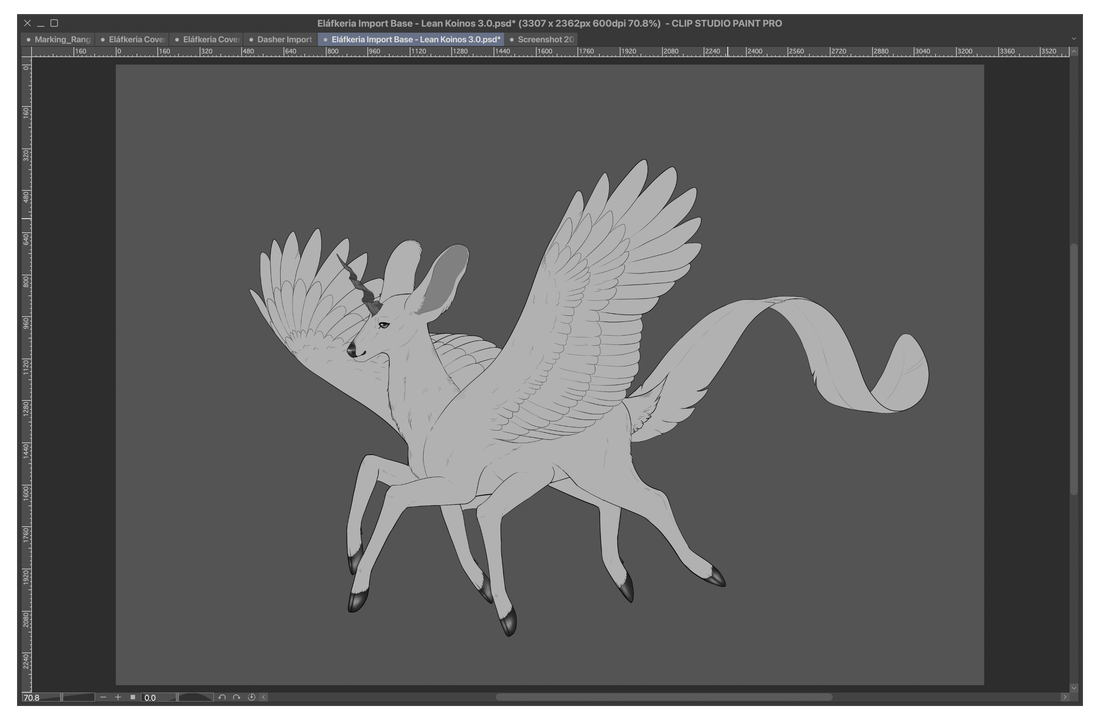
Lovely! Now that you’ve opened the base, you should be looking into the eyes of a gorgeous albeit simple-looking grey Eláfkeri. Here’s when your new geno-reading skills come in handy!
Remember the notes on physical traits? You'll need to read the physical traits on your geno to toggle the right folders for it!
The third line will state the Horn and Tail. On the layers section of your program, you’ll see a folder named “Horn” and a folder named “Tails”. Open each, and toggle on the Horn and Tail your Eláfkeri’s geno indicates. For us, it's the Twist Horn, and the Whip Tail!
Once you have those two, toggle off any remaining Horns and Tails that were previously turned on! You won't need those. You may also delete the unused folders, which will make the file lighter for your device.
As we've learned, the Mutations line isn't always present, but if your geno has one, it means you'll have to toggle those! Mutations in your geno will be in individual [brackets], so you’ll know how many your geno has by counting how many bracketed items there are in that line.
To toggle on Mutations, do the same as with the Horn and Tail; open the “Mutations” folder, and then open the lesser folders ( they’re sorted by rarity! ). Toggle on any folders that match names with the Mutations in your geno, and leave the others off.
Here's an example of the geno we've been using for the guide: it has the Twist horn, the Whip tail, and the Dasher mutation! Keep in mind we've toggled off the background for ease of designing, but haven't deleted the folder. We'll toggle it back on by the end.
Important Note:
Remember that Mutations can be customized as early as Approvals! You can draw your own version of a Mutation if you wish, as long as it follows the Mutation's rules.
Remember that Mutations can be customized as early as Approvals! You can draw your own version of a Mutation if you wish, as long as it follows the Mutation's rules.
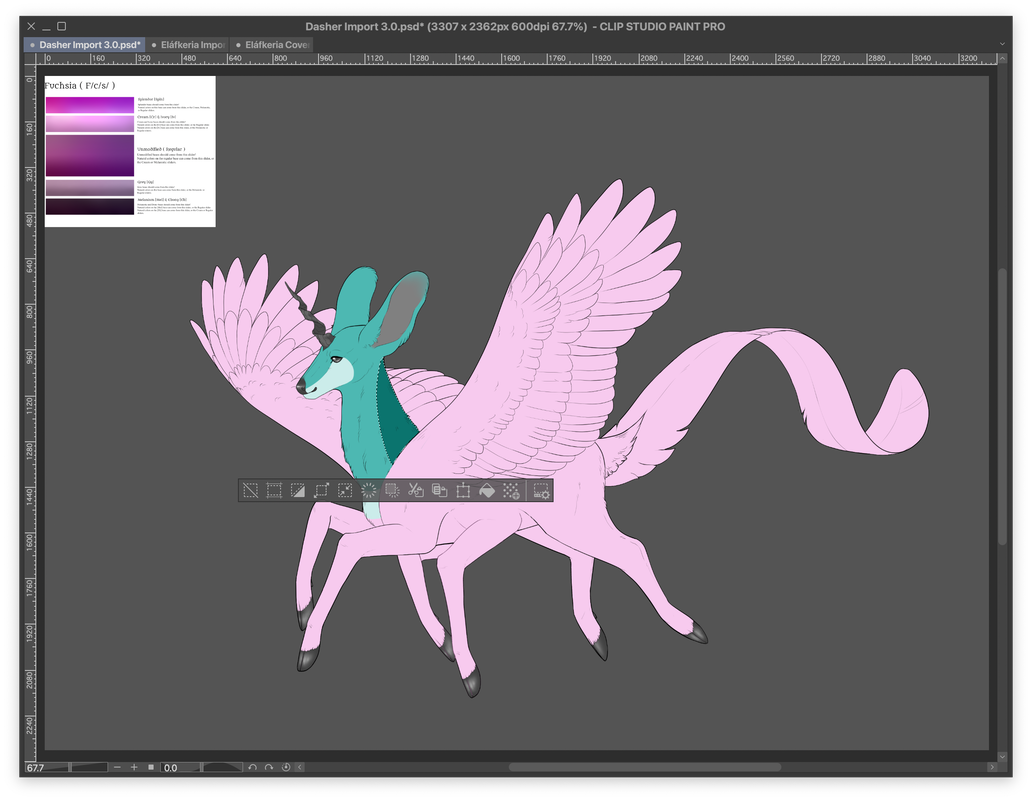
Colors: Base Coat & Base Modifier
Now that the Import base matches the physical traits of your Eláfkeri, it's ready for the next step: the base coat.
Usually, the base coat will be the first word in the Phenotype, but if there's a [bracketed] word, it means your geno has a Base Modifier. If you have a Base Modifier, the first word in the Phenotype will be a Modifier, and the second word will be your base coat.
For us, we have "[Ivory] Fuchsia". This means we have the [Ivory] Modifier, and the Fuchsia base coat!
The base coat dictates the general color your Eláfkeri's fur will be!
The base modifier, instead, dictates the specific color slider your Eláfkeri's fur color will come from.
Modifiers will also dictate what "natural color" genes will look like ( except for the Ivory and Ebony modifiers, which only affect the base coat ).
Once you read your base coat ( and Modifier, if any ), go to the Base Color Guide, and look for the color slider with your base coat's name and modifier!
Since our geno has Ivory, our base coat uses the second slider of the Fuchsia base coat slider image. We pick a color from there, and here's what we have now!

Note about Special Base Coats ( Pearlescence & Iridescence )
The Special base coats— Iridescence ( F/C/S/ ) and Pearlescence ( f/c/s/ )— do an extra special thing: they cause the design to have a shiny look, like the names imply.
This can be made by using a soft brush to create highlights and soft shading on the body. You may also use the premade shading found in the Import base!
Colors: Genes
Once you have your base coat ready, you'll need to find your genes' guides. The Genes and Mutations guide can be easily reached through the top menu here, or through the button below!
Each gene has a guide of its own. To avoid getting overwhelmed, you should open them one by one until you're used to them!
You may also use the Coverage Ranges .psd file, which contains all genes' coverage ranges for easy of selection and coloring.
Each gene has a guide of its own. To avoid getting overwhelmed, you should open them one by one until you're used to them!
You may also use the Coverage Ranges .psd file, which contains all genes' coverage ranges for easy of selection and coloring.
Step One: Find your coverage range, copy it into your Import, and select the minimum coverage
The .psd file will contain gene range guides for each existing gene! Find the one you need, and copy-paste it into the Import base. This will help you see what the minimum coverage is.
Using a selecting tool ( e.g. the Magic Wand tool ) to select the minimum coverage will help as well!
Here, we've done it for the Hood gene.
Remember: the darkest color is the minimum range, and the middle color is the maximum! The lightest color is for dominant genes only.
Step Two: Fill out the color, and make sure it stays within the coverage range!
Your gene's guide will specify the color rules; follow those to pick a color for your gene.
Once you do that, you may fill out the selected minimum coverage; this helps you avoid getting corrected in Design Approvals!
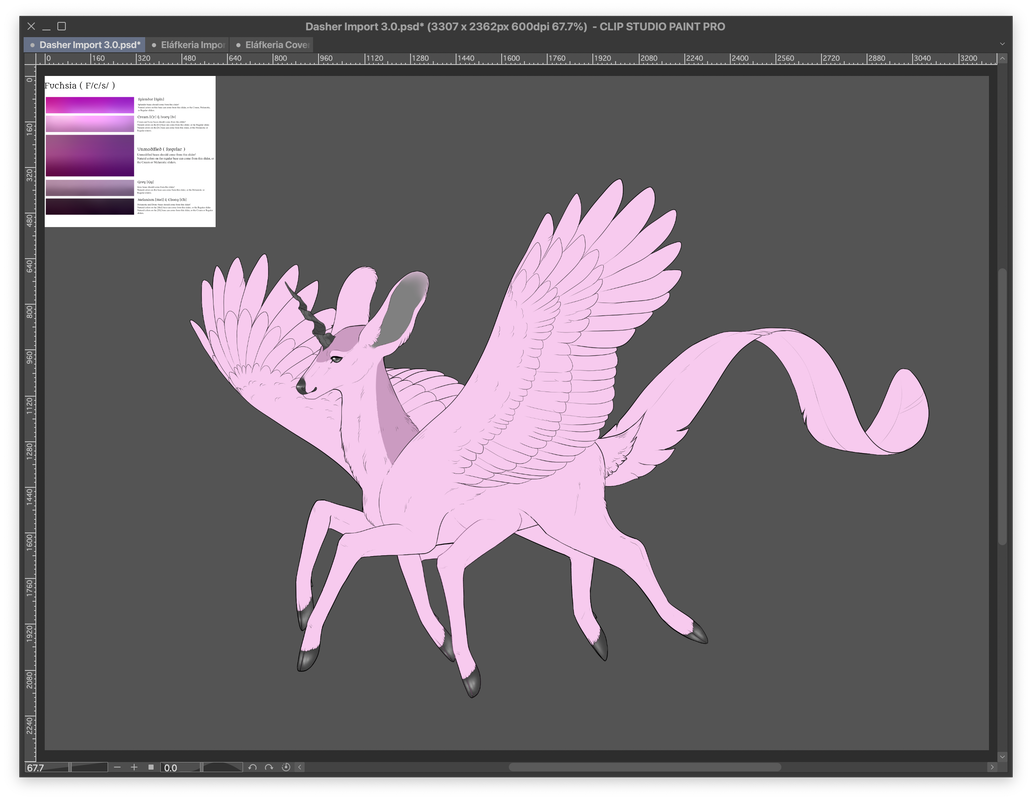
Here is Dasher's initial Hood; it fulfills the minimum coverage, and follows the color and texture rules.
Your gene's guide will specify the color rules; follow those to pick a color for your gene.
Once you do that, you may fill out the selected minimum coverage; this helps you avoid getting corrected in Design Approvals!
Here is Dasher's initial Hood; it fulfills the minimum coverage, and follows the color and texture rules.

Step Three: personalize the gene's design!
Your gene can cover up to the maximum range! You can do any natural design within the minimum and maximum boundaries— this helps you give your Eláfkeri some personality from the get go!
We've pulled Dasher's Hood up to the head, so that it's no longer naked, but we could've covered more ( or covered it in different ways ) if we had wanted to; so different Eláfkeria may have different-looking Hoods!
Step Four: rinse and repeat for all remaining genes!
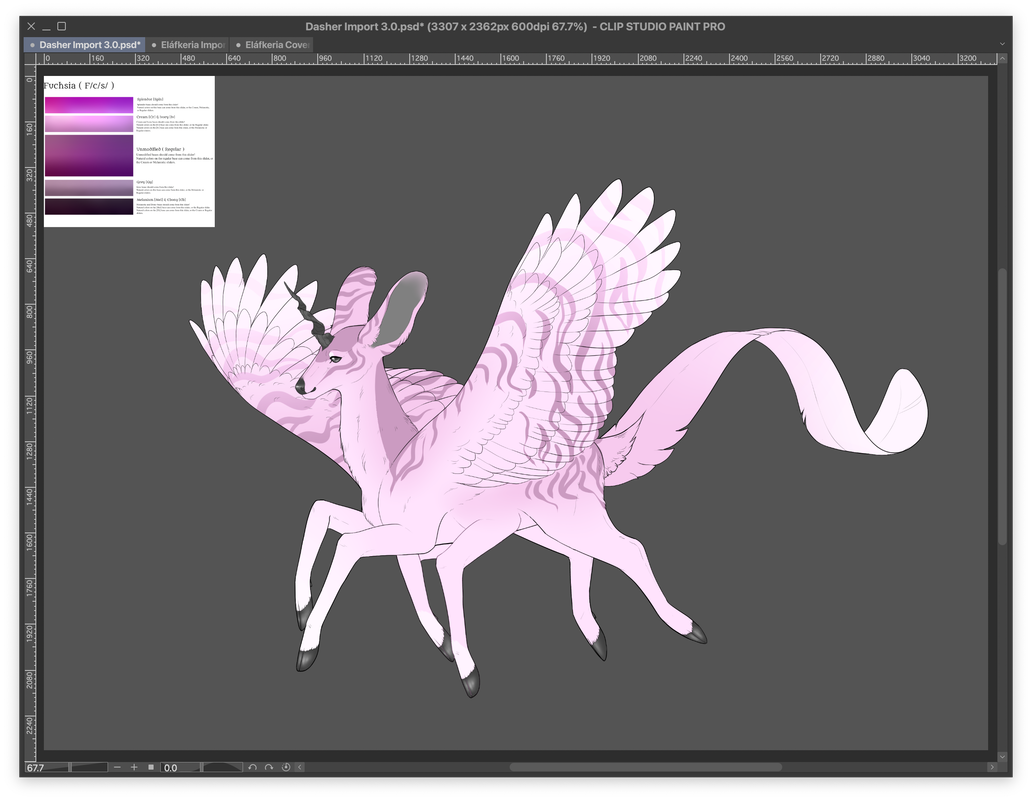
After doing the same with Dasher's other genes ( Bleach, Pangare, and Stripes ), this is the result!
Remember that any Mutations that contain fur may also be affected by genes, just like ow Pangare affects Dasher's mutation here.
After doing the same with Dasher's other genes ( Bleach, Pangare, and Stripes ), this is the result!
Remember that any Mutations that contain fur may also be affected by genes, just like ow Pangare affects Dasher's mutation here.

Extra Flair: Free Markings
Now that your Eláfkeri's genes are ready, you can begin making extra personalization to the design!
One of the easiest ways to achieve this is free markings ( also called free genes ). Free markings are genes that can be added freely to an Import, that will not affect the Genotype in any way.
You can find their guides and their coverage ranges in the same guide and file as regular genes!
You may add as many Free Marks as you wish.
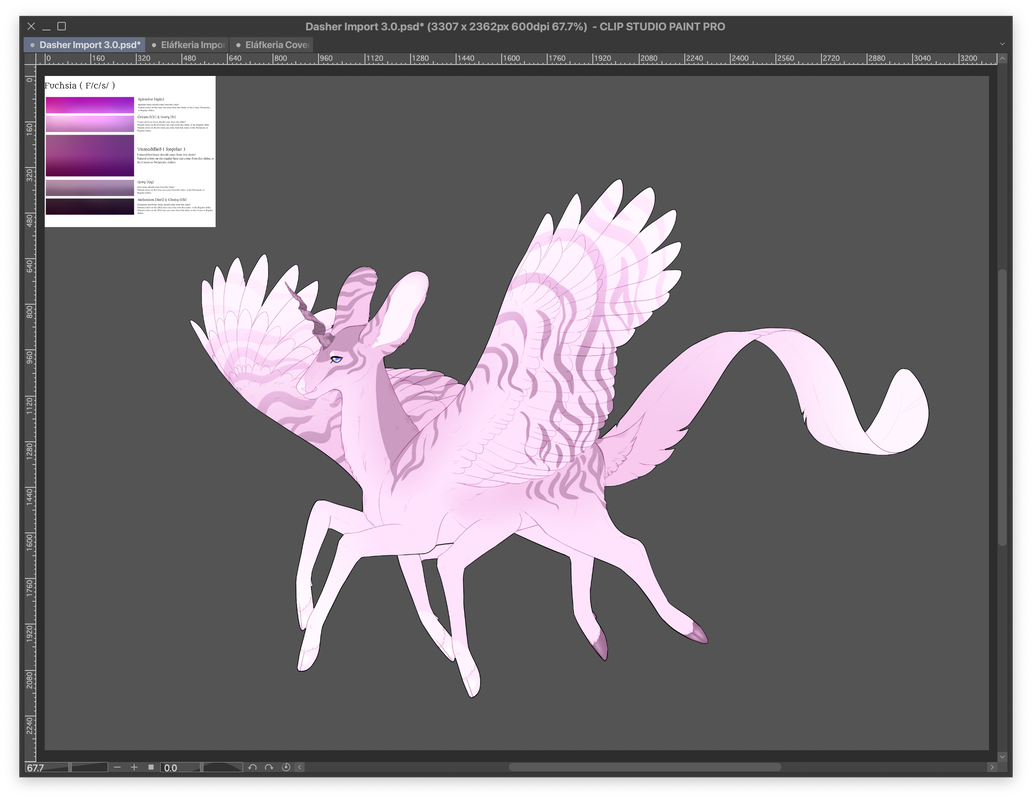
We've decided to add the Eye Dots free mark and the Socks free mark to Dasher.
They're small touches, but they help spice things up!
They're small touches, but they help spice things up!
Extra Flair: Line Work Coloring
Another easy way to customize the Import is coloring the line work!
Line work color must always be roughly the same hue ( color ) that what it's touching, and must be darker than what it's touching. The only exception is if your base coat is nearly black, then the line work may be lighter to help with visibility.
We've colored Dasher's line work by selecting the base layers, shrinking the selection, and coloring the line work within the selection! This leaves a black outline on the Import, making it visible against any chosen background.

Extra Flair: Skin, Keratin, and Eyes
Probably the most important part in customization! Coloring the skin, keratin ( hooves and horn ) and eyes of your Eláfkeri is the final step to having a nice new friend.
The Skin, Keratin, and Eyes color rules are found in the same Genetic Guides as all else, and they explain what sort of colors all these little pieces can be. Some mutations, like Albinism, can even affect these in special ways!
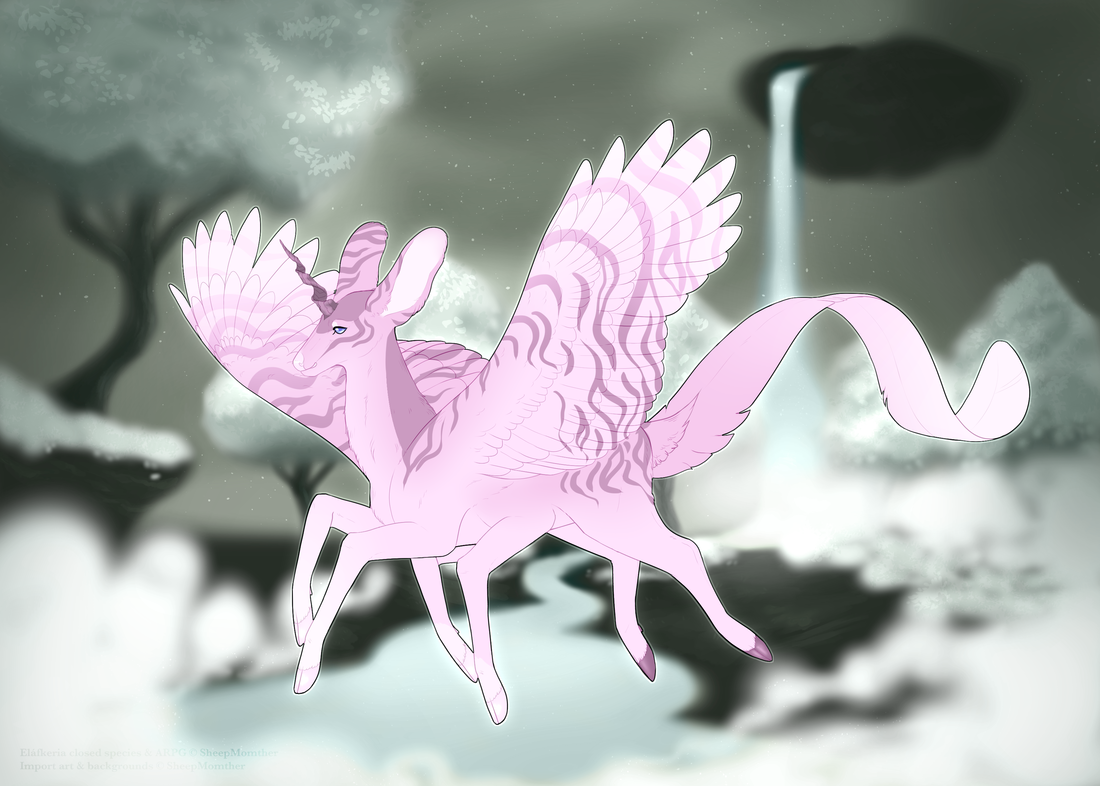
We've followed the rules to color Dasher's Skin and Keratin different shades of pink, and color her eyes a light blue.
The Skin, Keratin, and Eyes color rules are found in the same Genetic Guides as all else, and they explain what sort of colors all these little pieces can be. Some mutations, like Albinism, can even affect these in special ways!
We've followed the rules to color Dasher's Skin and Keratin different shades of pink, and color her eyes a light blue.
Extra Flair: Halos, Outlines, and Background
Halos and outlines are one last option you have to make your design pop out!
Outlines can be soft or hard edged, or even full blown gradients! They can be light or dark, or somewhere in between. You can even mix and match, creating more than one halo/outline to make the flair extra fancy.
However, make sure your outlines are never too bright, never too thick, and never too noticeable.
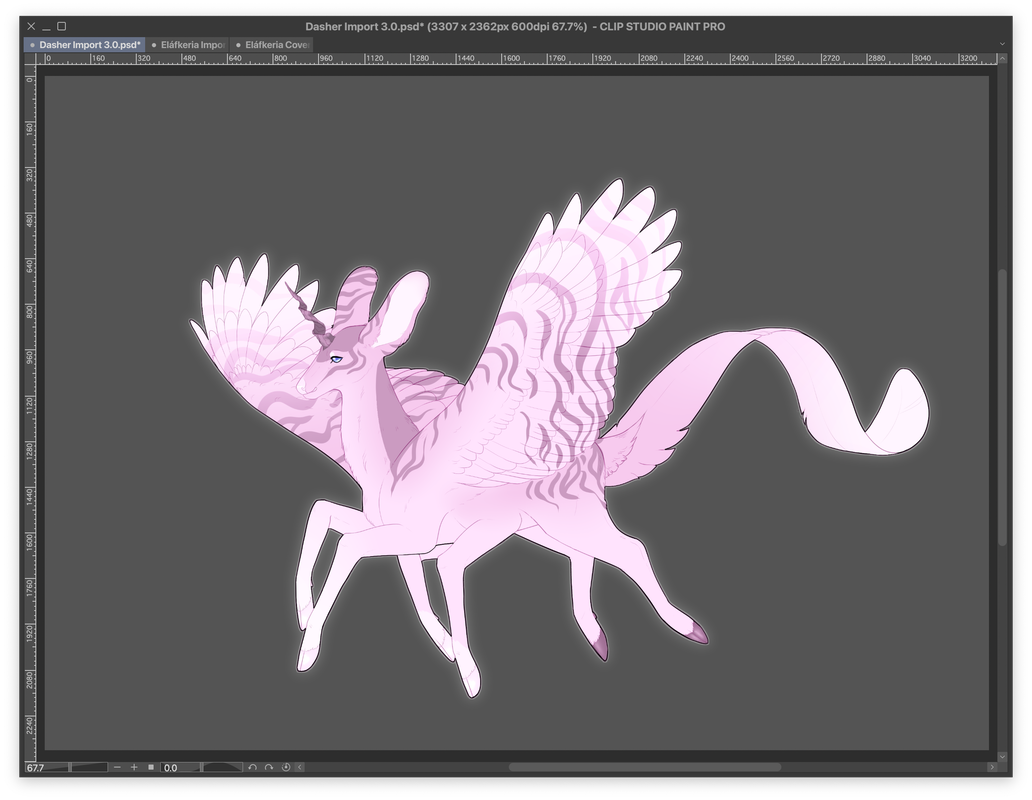
Here, we've made three outlines! One is a soft gradient, and the other two are hard edged. Two are light, and one is dark!
Outlines can be soft or hard edged, or even full blown gradients! They can be light or dark, or somewhere in between. You can even mix and match, creating more than one halo/outline to make the flair extra fancy.
However, make sure your outlines are never too bright, never too thick, and never too noticeable.
Here, we've made three outlines! One is a soft gradient, and the other two are hard edged. Two are light, and one is dark!
Now that Dasher is ready, all we have to do is choose a background!
You may choose any of the default backgrounds, any free backgrounds, or any backgrounds you've purchased from the Sky Fragment Shop or received from an Activity/Event!
We've settled on the green default background for Dasher.
You may choose any of the default backgrounds, any free backgrounds, or any backgrounds you've purchased from the Sky Fragment Shop or received from an Activity/Event!
We've settled on the green default background for Dasher.
They're all ready to go to Design Approvals now!
Learn how to submit a request here:
Learn how to submit a request here:
